-->

Theme Layout

Boxed or Wide or Framed

Theme Translation

Display Featured Slider

Featured Slider Styles

[Centered][caption2]

Display Grid Slider

Grid Slider Styles

Display Trending Posts

Display Author Bio

Display Instagram Footer

Search

Powered by Blogger.
facebook follow follow me on instagram follow me on pinterest

Sugar-coated Christmas


With December 25th right around the corner and the spirit of Christmas swirling around, my baking day with Nana needed to be planned! As many of you may already know, each year before Christmas I drive to Nana’s house in Sanford, NC, to spend the day baking sweets and snacks for her neighbors, friends, and our family. We were able to find one day on each of our calendars that worked for both of us, so we quickly penciled it in before another December event snagged it.


Once I arrived at Nana’s Wednesday morning, Nana and I planned our baking adventure, deciding what to make and in what order. Aside from pound cake, salted pecans, lady fingers (some without nuts just for my mother), and sometimes seasoned oyster crackers, we make batches and batches of sugar-coated peanuts. Not a year goes by that we don’t make at least two large tins full of them. Our sugar-coated peanuts recipe is one that was introduced to us by my great-grandmother and has been in our family for many decades.


Sadly, Great Grandmother Chagaris passed away a few weeks ago, on Saturday, November 23rd, at the age of 94. Fortunately I was home for Thanksgiving break and was able to be with my family.

She lived a great, long life, and in my 22 years of living I was able to learn many things from her. I learned what it takes and means to be a loving, caring, and loyal mother, wife, and friend; and aside from sugar-coated peanuts she also taught me what REAL fried chicken tastes like and how to make it, smother it with gravy, and eat the leftovers; She taught me that it’s okay if there’s a few ants in your cereal one morning because, “They won’t hurt anybody," and if you pour yourself a glass of sweet tea you better make sure it isn't vinegar because vinegar certainly doesn't taste as sweet!

Mother and I visited Great Grandmother quite often as I was growing up and I have many fond memories of being at her house in New Bern, NC, the same house she’s lived in for over 70 years and that she raised Nana and the rest of her children in! I remember running across the street to play on the same swings that Nana and her siblings played on many years ago--sometimes by myself, other times with some of the local children that lived there. I remember sometimes having to deal with my wacky great uncle, David, and his silly jokes and antics. But one of my favorite memories of being at her house was of this little kitten statue she always had sitting in her living room. As a child I was obsessed with kittens and pretty much anything else that was cute and furry, so I was naturally entertained by this little figurine even though it was fake. I also believed, as many little kids do, that anything could happen, and each day I spent at Great Grandmother’s I would close my eyes and wish and pray for that sweet little fake kitten to come to life. I still laugh each time I think of it, and I'm so thankful to have that little kitten in my possession now to serve as a reminder of my time in New Bern with my great grandmother!

Her sugar-coated peanuts are a treat my family never goes a year without! By Christmas Day we have all made too many batches, but somehow we never seem to have leftovers. Each year, Nana purchases bags of peanuts for us, with each bag making 3-4 batches. The peanuts are purchased from Johnson Brothers in Sanford, and hopefully they won't ever close because I'm not sure we'll know where to turn for our raw peanuts. Once our peanuts are measured out, we dissolve the sugar in a pot of water over the stove. Once dissolved we add in our peanuts and a few drops of red food coloring, just to make them look more festive. Then comes the hard part--stirring! I usually end up being the designated stirrer, stirring until the dissolved sugar becomes grainy and sticks to the peanuts, maybe 20-30 minutes depending on the size of the batch. Once they are grainy, the peanuts are then transferred to a baking sheet and placed in the oven to bake (up to 30 minutes, but check them every 10 minutes so they don't burn!). After they cool, they are ready to eat! The combination of the peanuts' natural saltiness and their sugary coat makes it impossible for you to eat only one.


I know Great Grandmother would be proud of the batch Nana and I made this time around because let me tell ya, they were mm-mm good! Though Great Grandmother is no longer with us, I know she and her southern ways will continue to live not only in our family's recipes, but in our traditions, gatherings, and hearts, too.


Sugar-coated Peanuts right out of the oven!


Below is our recipe.
Enjoy and happy baking!

Sugar-Coated Peanuts
1 cup sugar
1/2 cup water
2 cups raw, shelled Virginia peanuts with skin
Red food coloring (to make the recipe festive)

1. Dissolve sugar in water in sauce pot over medium heat.
2. Add peanuts and a few drops of red food coloring. Stir frequently until completely coated and no syrup left.
3. Pour on ungreased cookie sheet and separate with fork.
4. Bake at 300 degrees for 30 minutes, stirring at 10 minute intervals to prevent burning.
5. Remove from oven and cool completely before eating for best taste!
QuickEdit
Lgoodstat
1 Comments
Share :

These Are A Few Of My Favorite Things


With Thanksgiving only days away I wanted to post about this very special meal.

Last year Our State Magazine was looking to hire bloggers and writers for their new Our State Eats blog section of the magazine so they created a contest for the public  to enter. I had not heard of this contest until I came home from school one weekend and my mother had dog-eared the article and told me all about it and announced, “YOU MUST do this!” In order to enter the contest you were to write a piece about your absolute favorite meal. So we quickly began brainstorming favorite meals of mine. 

Although Mother and I were proud and satisfied with my final writing, Our State decided to go with a different meal and writer (their loss, right?). Regardless of the contest, Thanksgiving is still my favorite meal, but the food is not the only factor contributing to that title. Below I’ve shared with y’all my entry on why Thanksgiving is not only my all-time favorite meal but the favorite meal of our nation!

As a senior at the University of Georgia, and at the ripe old age of 21, I am probably a little younger than the average Our State reader. But for many years now, I have become accustomed to receiving the monthly issues from my mother, all of them with dog-eared articles and recipes that she deemed important. Pennsylvanian-born, but North Carolina bred, I come from a mixed breed of native Southerners and what everyone here would call Yankees. This mixture has thankfully given me the opportunity to have unique culinary experiences across North Carolina, the United States, and around the world.

Because so much of the food experience is where you are and with whom you are dining, it is hard to pinpoint one specific meal and label it as the best meal I have ever had. I’ve been so fortunate to travel a vast amount in my life and, because of that, I have tasted and savored some of the most exquisite flavors: shrimp scampi served on paper plates out of a roadside trailer in Oahu, Hawaii; dinner at B.E.D. in Miami, Florida; black truffle pizza on the shell-shaped Piazza del Campo in Sienna, Italy; coq au vin at Le Coq in the Trocadero neighborhood in Paris, overlooking the Eiffel Tower; the proper English tea at The Connaught Hotel in London. All of these experiences were amazing, mostly because of the people that were there to share them with me. But when I think about the best MEALS I’ve ever had, I would have to say that the simplest meals with my family have been the best.
When most Americans think of their favorite meal Thanksgiving is what tops the list. Each year I’m blessed to have two different Thanksgiving meals: one that incorporates my Jewish heritage, with dishes like Grandma’s beef brisket and kugel; and one that brings to life my true Southern heritage with good ole fried turkey, collard greens, dressing with gravy, and candied yams. Growing up as an only child, most of my meals were for an intimate party of one or two (either myself or a parent or two), which is why it is always a treat for me to get to spend Thanksgiving with my very extended family of aunts, uncles, cousins, and grandparents. Sharing that food experience with so many people only increases the flavors of the food we eat and the essence of family life.
Though the focus of my personal blog is desserts, I embrace the opportunities I have each day to experience all different cultures and their distinct foods especially those from the South and my North Carolina home. Because I’m so young, I look forward to the many more years I have to continue the never-ending quest to find my best meal ever.
That was my submission…can you believe they didn’t choose it!?
I’m blessed to say that my family's Thanksgiving tables are always quite full and at times we may even have to sit elbow to elbow (or place me at the “children’s table”). I’m looking forward to this year’s feast as new and old recipes are created, old memories are reminisced and new memories are cherished.

Happy Thanksgiving Y’all!
QuickEdit
Lgoodstat
0 Comments
Share :

Sugar and Spice and Everything Nice


Picking a treat to make this time around was a no-brainer because we are right in the middle of October--the month of all things pumpkin!

Now that I am a senior at The University of Georgia, I wanted to share with y'all something sentimental that really shows how my time here has come full circle.

Throughout my time at Georgia, I've gotten the chance to experience the deliciousness of what many of you know as "Muddy Buddies," or "White Trash," but what us dawgs call Puppy Chow!

I remember my orientation like it was yesterday. It was one of my first times on UGA's campus and my nerves were through the roof--I'm certain that if you stacked all my nerves and anxiety up, they would be as large as the campus itself! Once I met a few people my nerves quickly subsided and the excitement of actually being at college kicked in. I set up my class schedule and toured campus. I also took a spanish placement test, which ended up being a breeze because even though you weren't supposed to write on the test, the person before me did and did not do a great job of erasing their circled answers, so I used that as a personal guide. That may or may not be the reason I got placed in an extremely basic spanish class my first semester.

Anyway, next we were off to eat in one of the dining halls. I wasn't so much interested in the actual meals as I was in their dessert selection (obviously). So I ate whatever it is I ate and chatted with some new peeps until I decided to make my way over to the dessert station. There were the usual cookies, brownies, and various cake slices but aside from the typical spread, there was a larger than life sized bowl of what looked to me like sugar-coated chex mix. I quickly learned that it was "Puppy Chow" and it was DELICIOUS. It turned out to be some kind of chex cereal coated in melted milk chocolate with just enough peanut butter to complement the chocolate perfectly. It was then topped with powdered sugar to make this unique treat super messy but also super yummy. It was amazing to me how something so simple could be so amazing!

Luckily, they had baggies that I could fill up and take with me (phew!). I knew my dad would also have a field day with it so I made sure to pack more than enough for both of us. I was staying in the dorms that night, but when I went back I found that I did not have a roommate for orientation, and things got pretty boring, pretty fast--which is probably why I ended up eating the remainder of mine and my dad's Puppy Chow…poor guy.

Since then I've eaten Puppy Chow more times than I can count, and not once have I gotten tired of it. Between having it in the dining halls freshman year, enjoying Ms. Ada's for dessert when living in my sorority house sophomore year, having a handful or five after chapter dinners, and just making it here and there at home, it has become a normal part of my Athens life.

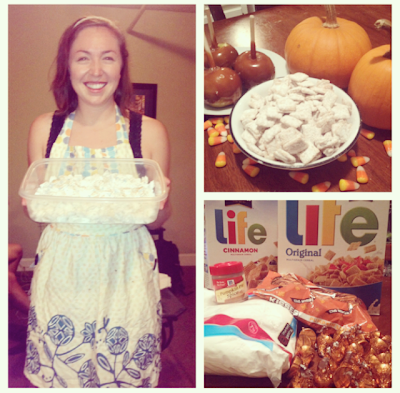
I've never really veered from the normal chocolate recipe, but I figured since it is October I should try something festive! That's why I chose to make a batch of Pumpkin Spice Puppy Chow! Over the past month or so I have seen a fair amount of pictures of similar recipes, but didn't know exactly how I would go about making my own. Earlier this week I went to Target to get the basics for Puppy Chow and just so happened to find Pumpkin Spice Hershey's Kisses! If you're mouth hasn't dropped to the ground yet, then you must not be human. I thought not only would I use this as the chocolate part of the recipe but it will work as the pumpkin flavor along with a little help from the pumpkin pie spices I picked up, too. The toughest task was actually figuring out which kind of cereal I wanted to use. Usually I go with the original Chex, but I wanted to try using a cinnamon flavored cereal with this particular recipe, so I chose Life cereal! Life's cinnamon cereal has the perfect amount of flavor and sweetness making it a long-time favorite of mine.


This kiss lost its BUMkin!

Once I purchased all of my ingredients I headed back to my apartment where I made plenty of Pumpkin Spice Puppy Chow for all of downtown Athens and made a mess of my kitchen along the way. This recipe was a hit among my roommates and friends…I could tell by their number of servings and the size of their eyeballs after just one bite!


As I was making my Puppy Chow, I took a stroll down memory lane--a lane that truly deserves a real life street sign here in Georgia. The summer before my freshman year, I can remember having a really hard time with the concept of going off to college, especially one that was four hours away from home. If you were around me that summer, then you can probably recall me either crying or having small panic attacks (or both) at the mention or thought of the word "college." And if you ask any of my friends, then they would probably tell you that none of us thought I'd make it much farther past first semester and we always laugh about that now! But here I am 4 years later, so close to graduating (fingers crossed…just kidding Mom and Dad!), and finding myself having small cryfests and minor panic attacks over the thought of leaving this place that I now call home.

I don't know exactly where I'm headed after graduation, but I do know that I'll always carry the recipes I've acquired, the memories I've made here and the happiness that accompanies them everywhere I go. 

So, cheers to these past four years, Puppy Chow, and to always being a Dawg.


You'll find the rest of the ingredients and recipe below!


Happy baking and GO DAWGS!!


Ingredients for one batch of Puppy Chow:

2 10-ounce bags of Pumpkin Spice Hershey's Kisses (you'll need a bag and a half for the recipe and the other half is for you to snack on!)
1 13-ounce box of original Life cereal (or Life's cinnamon flavor)
1 1/2 cup of confectioners sugar
Pumpkin pie spice (to taste and for topping)
  1. Fill a pot halfway full of water and set on stove over medium heat.
  2. Place sugar in a gallon size bag and set aside.
  3. While water is warming, unwrap the Hershey's kisses and place in large bowl (I used a metal one but a glass one would work great, too!)
  4. Set bowl on top of the pot. Stir with rubber spatula or large spoon until just melted.
  5. Remove from stove. Add half of the cereal and stir (be gentle as to not break the cereal too much). Add rest of the cereal and stir until cereal is well coated in chocolate.
  6. Pour mixture into the bag with sugar. Pour a couple teaspoons (or as much or as little as you would like) of pumpkin pie spices into bag, as well.
  7. Zip the plastic bag up without letting out too much air. Toss the bag around in efforts to evenly coat the cereal mixture in confectioners sugar and spices. Add more sugar if needed or wanted.
  8. Once you've mixed to your liking serve in a dish or out of the bag and enjoy!!
QuickEdit
Lgoodstat
1 Comments
Share :

Berries Galore!


Saturday morning, my mother and I got up bright and early and headed to the blueberry farm! Our friend, Craig Head, owns Headacres Farm in Bethany, North Carolina, which is about 25-30 minutes from our house. We’ve been visiting Headacres for a few years now, and have never been disappointed. Between the delicious blueberries, the fainting goats, and the great company, it’s nearly impossible to not have a good time out there. In the past we've brought along with us our friends, family, and the kids I used to nanny for during  the summers. The kids always had fun watching the goats faint all over the place, and particularly loved Van Goat -- the one who seems to be missing part of his ear. No matter what you're doing on the farm you're bound to have fun!

Headacres Farm

Toast time!


Mom and I arrived around 8:30; just in time for the first champagne toast of the morning...lucky us! We enjoyed our glass of champagne and a few blueberries with Craig before Mom and I got to work! Blueberry picking is something my mother and I did long before moving to Greensboro. I remember going as a little girl back when we lived in Pennsylvania. We would end the day at home with delicious home-made blueberry muffins. Here we are, 15 or 16 years later, still picking blueberries and having just as much fun.

It was already established that I was planning to make a countless number of treats so we both knew we were going to have pick plenty of berries to go around. Once we started picking we were on a roll and within 20 minutes we had gathered enough berries to feed the rest of North Carolina. Mom seemed to think we picked too many but I told her that was just not possible! After hanging out for a bit and chatting, we said our good-byes and headed home. On the ride home we talked about what I would be baking and what we had planned for the rest of the weekend. We listened to music and my mom shared that if it were up to her only happy songs, aka, the songs that play on her Jimmy Buffett Margaritaville station, would be played on the radio. "I'm going to invent a new music genre -- it's going to be genre, "Happy!" Okay, Mother. Can't wait.

Our beautiful blueberries!

Mama pickin' her berries

The rest of our Saturday consisted of us laying in the sun and experimenting with a couple different batches of homemade margaritas. It went without saying that the baking festivities would have to wait until Sunday.

I woke up Sunday morning ready to get to work in the kitchen! First, I decided to make a pie. When it comes to blueberry pie, there is only one recipe I've ever used -- my great-grandmother's. While picking up pie shells in the frozen section at the grocery store, I let out a gasp and a little squeal. Not because of the uncomfortably cold temperature throughout the frozen foods aisle, but because of what I found along the way -- MINI pie shells! I knew immediately that I just had to make cute mini pies so I snagged 4 packs of them and quickly scooted on over to the checkout counter.

Once I got back home, I began making my pies. Because I was making multiple small ones instead of one large pie, I had to change a couple things during the process. I made the mixture following the instructions and evenly distributed it among the shells. I wasn't sure how long they would each need to bake, so I just made sure to keep an eye on them while they were in the oven. I removed them from the oven when the outer shell began to brown. They looked as amazing as they smelled and I was too happy about it!


The second thing I made were blueberry muffins! I wanted them to be bursting with berries and flavor. I based my recipe on a basic muffins recipe found in Mrs. Lacy's cookbook. Mrs. Lacy's Magnolia House Tea Room is a little restaurant I've been going to all my life located in Sanford, North Carolina. Each time I visit Nana, we either make a trip to Mrs. Lacy's or place a to-go order and enjoy it at Nana's house. It's one of those small town places where you see almost everyone you know, especially in our family because my mom and her two sisters were born and raised there. I have so many fond memories of being there and always look forward to going back each time I head to Sanford.

I had planned on transforming Mrs. Lacy's basic muffins recipe into one full of mouth-watering flavor and personality. After thinking long and hard, I finally assembled my very own recipe -- blueberry muffins with a cream cheese filling and cinnamon streusel topping. YUM! I was quite nervous about making these because there were multiple components and I was experimenting. However, they baked and came out looking lovely and I couldn't have been more pleased!


Sunday night we had family dinner and of course had some of these pies and muffins for dessert, and the rest I took into work Monday morning. It seemed like everyone really enjoyed them and I got lots of positive feedback! It's safe to say that these treats will definitely be made again.

The recipes for both are below.

And as usual, until next time, enjoy and happy baking!

Mini Blueberry Pies (makes 1 large pie or 12 minis):

2 cups blueberries
3/4 cup sugar
1/4 cup flour
ground cinnamon
dash of salt
butter

1. Mix all together except butter.
2. Pour evenly into 6 mini pie shells.
3. Dot each with butter.
4. Place another pie shell on top.
5. Bake at 350 degrees for about 25 minutes or until shells are nicely browned.

Blueberry Muffins with Cream Cheese Filling and Cinnamon Streusel Topping (makes about one dozen):

Cream Cheese Filling:
8 oz cream cheese
3 tbsp sugar
1 egg (if you are looking for a more dense filling then leave this out)

Combine ingredients and mix with electric mixer on low speed until all ingredients are integrated; set aside until needed.

Cinnamon Streusel Topping:
3/4 cup all purpose flour
1/2 cup packed brown sugar (I used light brown sugar)
ground cinnamon (about 1 tsp or to taste)
1/4 cup butter, melted

Combine all of ingredients and mix thoroughly. For best results use your hands; set aside until ready to use.

Muffins:
2 cups self-rising flour
1/2 cup sugar
2 eggs, beaten
1 cup milk (I prefer baking with 2%)
1/2 cup vegetable oil
1 tsp vanilla
1 1/2 cup blueberries

1. Preheat oven to 400 degrees and place paper muffin liners in muffin tin.
2. Combine flour and sugar in a mixing bowl. Then, make a well in the center of the mixture and set aside.
3. In another bowl combine egg, milk, oil, and vanilla. Add to dry ingredients, stirring just until moistened.
4. Add the blueberries.
5. Spoon mixture into muffin pan, about halfway. Add a spoon full of filling to each muffin, then add more muffin batter to each, filling them to the brim.
6. Using your fingers, crumble the cinnamon streusel topping until each entire muffin is covered completely.
7. Bake for about 12-14 minutes. It may take longer depending on your oven so just keep an eye on them while they are baking!
QuickEdit
Lgoodstat
0 Comments
Share :

"Bring Your Dessert To Work" Day!


I recently decided that each week I would bring in a different dessert to work. This summer I've had the opportunity to intern for The Sales Factory, a full service strategic marketing and advertising agency, here in Greensboro. I knew I would be gaining a great deal of experience with my job in just these short couple of months but I never expected to fall in love with it as much as I have. TSF's work environment, people, and success have helped to make this summer one of my favorites! When it is time for me to head back to school, I'm secretly hoping they will tell me to just go ahead and quit school and come work for them permanently...a girl can dream, right?


I wanted to start off with something really fun and decadent this week! I was originally thinking about making cake pops so I kept those in mind as I browsed my Pinterest boards for ideas. Cake pops are one of my favorite things to make so they actually have they're very own board.  My cake pops have never failed me and I'm pretty sure they're the reason I passed physics in high school...or it could have been my giant cupcakes, my brownies, or the endless supply of cookies. As you can see, I was a bit of an overachiever when it came to school.

I was exploring my various pins and I came across a bunch of different truffles that had me changing my mind about the cake pops. I tried to choose between making truffles or pops but eventually asked myself why settle for just one? I decided to combine both and create truffle pops!

I knew making them would be just as fun and possibly a little easier as there would be no cake to bake. Because truffle pops, or any kind of pop, are nearly bite sized, I wanted to make these super decadent and exploding with flavor.

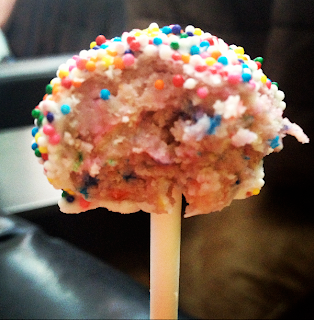
I came across this recipe for truffles made with the white and pink frosted circus animal cookies and as soon as I laid my eyes on these I knew I had to give them a try, but in "pop" form!

They came out better than I imagined they would and were a hit at home and at work! Their small size, bursts of colors, and sweet as can be flavor can put a smile on anybody's face...and stomach!


I went a little overboard when i was taking pictures of the truffle pops because i just could not get enough! Choosing only a few photos was way too difficult so I included a bunch below, along with the recipe I used.

Hope y'all enjoy and happy baking!


Mark's the first customer! He loved it!


Circus Animal Cookie Truffle Pops:
1 bag circus animal cookies
6 oz plain cream cheese, slightly softened (or 8 oz cream cheese frosting)
White and pink candy melts (I purchased mine at Michael's)
Pink and/or white nonpareils or rainbow sprinkles
Lollipop/candy sticks
Pasta colander or chunk of styrofoam

1. Line baking sheet with parchment paper and set aside. In a food processor, grind the cookies (about 1 cup at a time) until finely chopped. Pour all the ground cookies into a large bowl.
2. Next, spoon in the cream cheese and mix together how ever you would like. I prefer using my hands! It gets a little messy but seems to be more efficient than a spoon or spatula.
3. Roll mixture into 1 inch-sized balls and place onto baking sheet.
4. Refrigerate (or freeze) the truffles for about an hour or until you're ready to decorate.
5. Place truffles on candy sticks. Dip half the batch into the white chocolate and the other half into the pink chocolate (When melting the chocolates, follow the bag's instructions). Allow the excess chocolate to drip off the bottom. After dipping each one, stick truffle pops either in a chunk of styrofoam or an upside down pasta colander so they are able to be somewhat vertical.
6. While still wet, decorate with sprinkles/nonpareils.
7. Allow all truffle pops to harden and set in the fridge. Store in either the fridge or freezer until time to serve.
QuickEdit
Lgoodstat
0 Comments
Share :

Dad's Day!


Father’s Day was a few days ago and I’m so thankful I was able to spend not only the day but also the entire weekend with the best guy in the world – my dad! Or Howie, as some of my friends call him.

My dad was relocated to Nashville, Tennessee earlier this year and although I’m away at school in Georgia a majority of the time and don’t see him very often, it’s still a little strange to think he’s living anywhere but Greensboro. Greensboro has been our home for the past 15 years and I know it will continue to be my dad’s home even though he’s over 400 miles away. It’s safe to say I’m not the only one here in the boro who misses him.

My favorite guy

I’m constantly reminded of how great of a guy my dad is whenever I run into our friends, family, and even acquaintances around town. Now, for those that have not visited Greensboro, it isn’t very big so I almost always run into people we know whether at the gym, tennis courts, near-by Harris Teeter, Fresh Market, or Friendly Shopping Center. And every time I do run into someone, one of the first questions I’m asked is, “How’s Howard doing?” I fill them in on what he’s been up to and when he is next visiting home. They usually reply by saying, “We just love your dad,” or “You’re dad’s the man,” or “Howard is just the nicest guy.” The list goes on and on, and if I sat down one day and wrote down all the nice things I’ve ever heard about my dad I would end up with novels upon novels.

Us at Disney World

For Dad’s day, I wanted to give him something that I knew he would absolutely love! Well it took me about a mere 30 seconds to come up with something. Whoever first said that the way to a man’s heart is through his stomach sure must’ve met my dad a time or two. If there’s one thing that Howie can never turn down, it’s anything sweet and/or chocolate. We always make fun of him because every morning for breakfast he sits down with his two chocolate fudge pop tarts and diet coke. If he were ever stranded on an island and could only bring 5 things with him, those two would definitely make the cut. The third thing would be water because, as he says, it always seems to “hit the spot” for him even if we are sitting at a bar while I enjoy my glass (…or bottle) of pinot grigio. The fourth item would be string green beans. I only add these in because once upon a time the two of us were out to dinner and enjoying said green beans and my dad basically shouted to the rest of the restaurant, “These green beans are so good, they taste like candy!” I assure you they did not taste like candy and I quickly reminded him they were a vegetable. I still haven’t let him live that one down. And if any one knows my dad at all, you would obviously know that the fifth thing accompanying him on the island would be his beloved treadmill. That man could run for days…or until he got hurt which would probably be sooner than later. Bless his heart!

Anyways, back to his gift! At the beginning of the summer I told myself I would embark on a journey to make the perfect chocolate chip cookie and Father’s Day seemed like the perfect time to showcase what I had come up with. I had been doing my research by visiting various baking blogs and cookbooks to find the ingredients and recipes that would lead me to THE chocolate chip cookie.

So I took what I learned and played around with some recipes. Long story short, batch number one tasted delicious but looked somewhat disastrous, in my opinion. For those who don’t know me too well, you should know that if whatever I bake doesn’t come out perfect, then I pretty much hate it. When it came time for batch number two I changed some measurements, the type of chocolate chip, and the baking time. I also used some tips and ideas from sallysbakingaddiction.com. Sally’s blog, recipes, and pictures are all amazing and I hope I can one day build my blog and name to be just as great as hers. In the meantime, I will continue to visit her blog and her other social media pages and take away as much as I possibly can from her work.

The heavenly aroma taking over the kitchen let me know that batch number two was ready to come out of the oven.

And…

I didn’t hate them!!!!

In fact, I loved them. If I could, I would have held them and cradled them like babies forever.

Howie loved them, too! He even ate two in one sitting. Don't get too crazy now, Dad.

Ready for the oven!

THE Chocolate Chip Cookie #perfection

Although he did manage to eat two at one time, I knew he would not be able to finish a whole batch so I sent the remaining cookies to my friend, Willie, who is working in New Jersey this summer and completed a triathlon on Saturday! I figured he would enjoy a cookie or nine after his race. Why anyone would do a triathlon is still beyond me. The race consisted of swimming 600 meters, then biking 22 miles, THEN running 5 miles. Although I was quite the swimmer back in my day (and have all my first place ribbons to prove it) I’m sure I would still end up drowning after a few meters. I’m tired just talking about it…sheesh!

Willie and I!

To conclude, my cookies were quite a success and so was my entire weekend thanks to my wonderful, sweet and amazing dad! Not only is he my dad, but he’s also my friend, and I’m so blessed to have him in my life!

Love you, dad!

I’ve shared the recipe I used below…enjoy!

And happy baking!!

Cookies:
 2 and 1/4 cup all-purpose flour
 1 teaspoon baking soda
 1 and 1/2 teaspoons cornstarch
1.5 sticks salted butter, melted
3/4 cup light brown sugar
1/2 cup granulated sugar
1 large egg
1 egg yolk
2.5 teaspoons vanilla extract
1.5 cups mini chocolate chips (or however many you like!)

1. Combine the flour, baking soda, cornstarch and salt in a 
medium-sized bowl.
2. In a different bowl, whisk the butter, brown sugar, and white sugar together until no lumps remain.
3. Then add the egg, egg yolk, and vanilla. Whisk until well combined.
4. Pour the wet ingredients into the dry ingredients. Mix together preferably with a rubber spatula.
5. Fold in the chocolate chips.
6. Chill the dough for at least an hour.
7. Take the dough out of the refrigerator and let sit for a few minutes.
8. Preheat the oven to 325F degrees and line your baking sheets with parchment paper.
9. Roll the dough into balls. Tip from sallysbakingaddiction.com: “Roll the cookie dough balls to be taller rather than wide, to ensure the cookies will bake up to be thick.”
10. Bake the cookies for 10-12 minutes but keep an eye on the oven so they don’t overcook! The cookies will keep cooking on the baking sheet once they are removed from the oven so do NOT let cookies bake any longer than 10-12 minutes.
11. Let the cookies sit on the cookie sheet for about 7 or 8 minutes before moving them to a cooling rack or cool surface.

QuickEdit
Lgoodstat
2 Comments
Share :
[name=Lindsey] [img=https://blogger.googleusercontent.com/img/b/R29vZ2xl/AVvXsEhIZo103-X9sb8KV08pHrxb5ET5nWahtRXEkU5-h7Vhk0LP9e7tcu7adeE0wFYSrzV7qAAvFtMP-vBu94ImpKVp4G8BgummdvHxVyvumJVjTTPl9mCq_Sj6DFP5zqPJib8ezjD4m-m_oxtn/s100/DSC_0278.jpg] [description=Thanks so much for stopping by! I'm always always always looking for new recipes, decor ideas, and good company, so please feel free to leave a comment or reach out to me via email. Don't forget to subscribe for 203YP updates! And if you're looking to place an order, head to the "Request A Sweet Order" page!] (facebook=https://www.facebook.com/linds.eli) (instagram=https://www.instagram.com/lgoodstat/) (pinterest=https://www.pinterest.com/lgoodstat/)

Follow @georgialoustudios